
The attached material may be part of the story
A bit of metal, wire or other material on a coin can tempt you to scrape it away to see what is underneath. That is exactly the wrong starting point when a retained struck-through error is possible. The relationship between the material and the surrounding design may be the most useful evidence the coin carries.
What it means: A struck-through error occurs when foreign material comes between a die and the coin during striking. If that material remains embedded in or attached to the struck coin as a result of the strike, collectors call it a retained strike-through. An object attached after the coin left the press is not the same thing. Its presence alone does not establish when or how it became attached.
What happens in the press
The dies normally transfer their designs directly to the blank. An intervening object disrupts that contact. It may leave an impression and fall away, producing a non-retained strike-through. In other cases, some or all of the material stays with the coin. PCGS explains this distinction in its overview of the two struck-through categories.
Because the intervening material and its position vary, the resulting marks do too. A collector should not expect every retained example to resemble a wire or every depression to reveal a recognizable object. Nor does a dramatic appearance make the cause self-evident. The question is whether the whole pattern is consistent with the striking process.
A documented example: brass on a British 50p
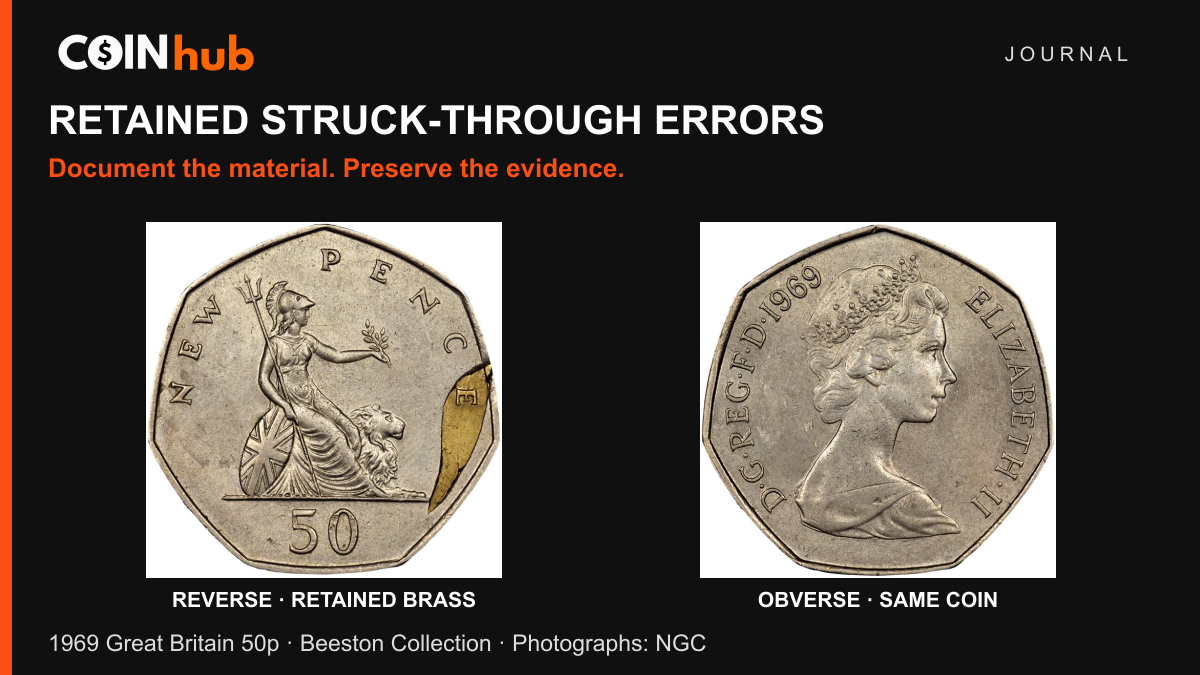
The photographs above show a 1969 Great Britain 50 pence coin from the Beeston Collection. NGC describes it as Mint Error MS 63 with a retained brass strikethrough on the reverse. The reverse is the side with Britannia and the denomination; the portrait of Elizabeth II is on the obverse. The retained material is visible at the right of the reverse.
This is a reference specimen identified by NGC, not a promise that any yellow patch on another coin is brass or a mint error. Its documented attribution provides context for studying the relationship between an object, the design and the surrounding surface. Read NGC's Beeston Collection feature for the original specimen description.
Build a record before attempting an identification
Keep the coin supported and handle it by the edge when necessary. Take a full photograph of each side, then a sharp close-up that includes the object and some undisturbed neighboring design. Add a view with light coming from the side to show relief and the boundary. A second lighting angle can reveal whether a dark area is a recess or merely a shadow.
| Record | Why it helps | Limit |
|---|---|---|
| Both complete sides | Connects the detail to the coin and its overall condition | Does not establish authenticity alone |
| Object and surrounding design in one close-up | Shows their physical relationship | A photograph may hide adhesive or surface alteration |
| Different lighting angles | Helps distinguish height, depressions and shadows | Color does not identify composition reliably |
| Provenance and prior holder description | Preserves the history you actually know | A seller's story is not independent verification |
Write observations in plain terms: “thin material along the reverse rim,” for example, rather than immediately naming a metal or manufacturing cause. Keep the original photographs. Heavy sharpening and artificial enhancement can make boundaries look more convincing than they are.
What not to test at home
Do not pull, pry, scratch, heat or soak the material to see whether it stays attached. A destructive test can remove a genuine retained object, change its boundary or damage the underlying coin. If the material already appears loose, minimize movement and ask a specialist about safe containment before mailing it. Avoid pressing the object flat in a tight holder.
Our handling guide covers ordinary precautions. For a possible retained object, preserving its existing position deserves additional care. An expert can decide whether closer physical examination or specialized analysis is useful; the owner does not need to sacrifice evidence to demonstrate curiosity.
Separate nearby explanations
Glue, solder, corrosion products and debris acquired after striking can all complicate a surface. Material remaining in place is therefore a clue, not a verdict. A visible design impression associated with an object may be relevant evidence, but an internet photograph cannot exclude every alteration or fabrication.
A peeling layer of the coin's own metal belongs to a different diagnostic discussion; see our lamination-error guide. Weak or missing design caused by filled die recesses also requires different evidence, discussed in the grease-filled-die guide. Do not use these labels interchangeably simply because all can involve missing or unusual detail.
Identification comes before a price
The denomination, object, visibility, condition and confidence in the attribution all affect how collectors assess an example. There is no responsible universal premium for “something stuck to a coin.” Begin with a qualified error specialist or an appropriate grading service, sharing the photographs and history without disturbing the surface.
Sources checked September 18, 2026: PCGS's mechanism explanation, NGC's Beeston Collection report and NGC's struck-through overview. The pictured NGC grade applies only to that reference coin. This guide does not authenticate or value a reader's find.